
beauty,

2. Next, moving to eyebrow.
7. Brighten your eyes I'm using Memebox x Pony Shine Easy Glam 2 pearl color at the front part of my eyes.
 Using Solone Gel Pencil in brown to fill in my upper waterline.
 Draw eyeliner with natural wing. I'm using Clio waterkill liquid eyeliner in brown.
 Tadahhhh~~~ My lashes was not done yet.
In order to let my lashes to stay curl for whole day.
 Now, curl your upper lash once you done with hair dryer and apply mascara with both upper and lower lashes.
10. Shading

In order to create a deeper eyes and higher nose look, I apply shading on my eye that near my brow.
ans also, on my nose bridge.
I'm using Pony Effect Contouring Master Palette #Marvelous
 Not forget to contour cheek bone and jawline.
11. Blush

Apply a cooler tone blush to match the entire makeup.
Using Nyx Ombre Blsuh #Mauve Me
See you on next post!
[Tutorial] Fall Makeup Tutorial

I know the season of fall was ended for so long.
But it just can't stop me to share about my favorite fall makeup.
Yes, this is my favorite makeup among all.
Decided to have a picture tutorial after blogging for so long. Loll.
Let's start with base first:
 1. In order to correct the skin tone of my face, I'm using Sleek Colour Corrector Palette to conceal the important area for my face.
 1. In order to correct the skin tone of my face, I'm using Sleek Colour Corrector Palette to conceal the important area for my face.
Pink - As highlighter for forehead and nose bridge
Yellow - Correcting the dark area of my eyes (depend on your skin tone, you might use lavender color to lighten your dark circle as well)
Green - Cover to redness around my nose edge

Before I started to color correct my skin, I will apply Innisfree Mineral Makeup Base to give a brighter finish of my skin tone. After this is to color correct my skin in detail.
Then, I will conceal my dark circle using Maybeline Instant Age Rewind Eraser.
Lastly, even up all of the color with Clio Waterkill Cushion.
Ps: This cushion is a must try (High coverage without smudging for entire day!)
2. Next, moving to eyebrow.

I'm using Innisfree Eco Eyebrow Pencil - Expresso Brown. Starting with outline your brow first.
After that, fill in will light pressure using the pencil. Then blend evenly with eyebrow brush.
Not forget to blend your brow with finger to create natural finish.
 The outcome without eyebrow mascara.
I'm not satisfied with it as it was too dark.
 Hence, eyebrow mascara will make a change for it.
Swipe it on your brow without touching your skin in Z shape.
Then, use a eyebrow brush to blend evenly.
I'm using Innisfree Ultrafine Brow Mascara in Starry Golden Brown.
 Can you spot the difference?
3. Moving to eye makeup.
I'm using Sleek Makeup Color Corrector Palette in orange as eye base.
Apply evenly and blend it with finger.
 Here is the result.
4. Eye shadow Next, apply Mac Soba on the upper lid using a point brush.
After that, fill in will light pressure using the pencil. Then blend evenly with eyebrow brush.
Not forget to blend your brow with finger to create natural finish.

I'm not satisfied with it as it was too dark.

Swipe it on your brow without touching your skin in Z shape.
Then, use a eyebrow brush to blend evenly.
I'm using Innisfree Ultrafine Brow Mascara in Starry Golden Brown.

3. Moving to eye makeup.

I'm using Sleek Makeup Color Corrector Palette in orange as eye base.
Apply evenly and blend it with finger.

4. Eye shadow
 Next, apply Mac Soba on the upper lid using a point brush.
Make it longer than your eye shape to let your eyes look longer.
5. Next, use Sivanna Naked Palette apply on the lid that near the eyelashes.

 Using the same color at the entire bottom eyelid.
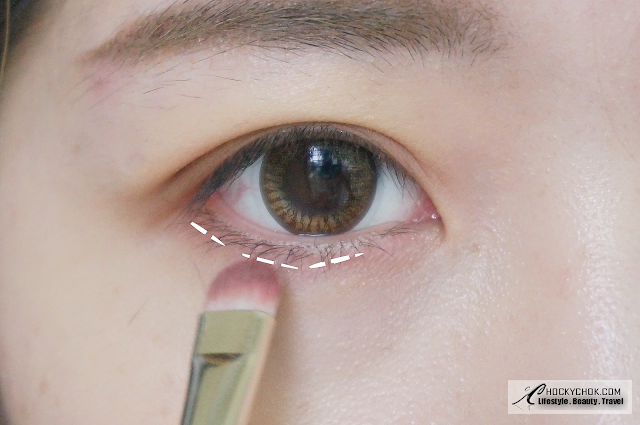
6. Apply eye shadow under your eyes.
Using Vdl Expert Color Eye Book 6.4 no. 5 color in 2041.
Connect top and bottom of your eyes naturally.
5. Next, use Sivanna Naked Palette apply on the lid that near the eyelashes.


6. Apply eye shadow under your eyes.

Using Vdl Expert Color Eye Book 6.4 no. 5 color in 2041.
Connect top and bottom of your eyes naturally.
7. Brighten your eyes
 I'm using Memebox x Pony Shine Easy Glam 2 pearl color at the front part of my eyes.
8. Eyeliner

 Draw eyeliner with natural wing. I'm using Clio waterkill liquid eyeliner in brown.
 Tadahhhh~~~ My lashes was not done yet.
9. Eyelashes
Here is my little trick.
In order to let my lashes to stay curl for whole day.
I'm using hair dryer set to hot temperature and blow the upper part of my eyelash curler.Just a few seconds. If not your eyelid will not able to stand the temperature of the curler.
 Now, curl your upper lash once you done with hair dryer and apply mascara with both upper and lower lashes.
I'm using Shishedo Eyelash Curler and Clio Eye Hitch King Volume Mascara.
10. Shading

In order to create a deeper eyes and higher nose look, I apply shading on my eye that near my brow.
ans also, on my nose bridge.
I'm using Pony Effect Contouring Master Palette #Marvelous
 Not forget to contour cheek bone and jawline.
Using the same palette.

Apply a cooler tone blush to match the entire makeup.
Using Nyx Ombre Blsuh #Mauve Me
12. Lip

To create a full lip make with nicer outline, I'm using lip brush to apply the lipstick
and fill it in using the lipstick itself.
Main color is Mac #Mocha and I added slightly touch of A'Pieu Lip Tint to create some natural gradient.
 Done. Sorry for my cracked lips. My lips wasn't in a good condition while I shooting for this tutorial :(


 How do you feel it?
I feeling fall. xD
How do you feel it?
I feeling fall. xD
If you get what I mean.
Gonna sign off now.
and fill it in using the lipstick itself.
Main color is Mac #Mocha and I added slightly touch of A'Pieu Lip Tint to create some natural gradient.
 Done. Sorry for my cracked lips. My lips wasn't in a good condition while I shooting for this tutorial :(
And we're done!
The Final Look:


 How do you feel it?
If you get what I mean.
Gonna sign off now.
See you on next post!


![[Travel] Taiwan 9 Days 8 Nights // 台湾9天8夜 (The 2nd Day 第二天)](https://blogger.googleusercontent.com/img/b/R29vZ2xl/AVvXsEjxpBQKoKdHtBEFzym0GKHfelrqfJeUHYwYUhyphenhyphenUkOCuNRJdzvQnnnc54HOW3LYLisV3oCnjbL1Ks2iDdMsHKarXtQ7tlGkftDaQQQe81aKv0OIo7wpW_NOYvdnIKCrEREUvT__MA0mO3k1b/s72-c/DSC04157.png)
0 comments: